Stay Connected With The Latest Posts

  • This field is for validation purposes and should be left unchanged.

Stay Connected With The Latest Posts

United States of America Framed

Kate

Hi there, I’m Kate. Welcome to White Lane Decor. Thanks for stopping by. I love neutral, bright, and airy spaces. I’m always looking for new ways to turn our house into a home. Have a look around and find inspiration for your next project.

Disclosure

Some of my blog posts, ads, and banners contain "affiliate links." This means if you click on the link and purchase the item, I will receive an affiliate compensation. However, I only recommend products or services I use personally and truly feel you will enjoy too! I am disclosing this in accordance with the Federal Trade Commission's 16 CFR, Part 255: "Guides Concerning the Use of Endorsements and Testimonials in Advertising.” White Lane Decor is a participant in the Amazon Services LLC Associates Program, an affiliate advertising program designed to provide a means for sites to earn advertising fees by advertising and linking to amazon.com.

Shop My Home

United States of America Framed

Ok, this was on of those projects where I got really excited to get finished and didn’t take very many “before” pictures. Sorry, but hopefully I will explain it all well. I ordered this United States of America metal artwork off eBay for my son’s room. I just loved the look of it made from old license plates.  When it arrived, it was much smaller than I thought it would be. It also had two holes at the top the size of a hole punch. It wasn’t quite what I expected. Instead of shipping it back and wasting time, I came up with a plan to make it work.

IMAG1009
First, I went to Hobby Lobby and found a nice large frame the size I wanted the piece to be. It was white, of course. However, the white just didn’t seem to fit with the style I was going for. So I took my Minwax jacobean stain and glazed the frame. Once it was all glazed I sanded a few areas to distress it very lightly.

This picture frame came with a cardboard piece between the glass, as most picture frames do. I needed some way to get the metal United States sign to stay. Since it already had two holes I decided I would use the cardboard it came with and gold brad fasteners to attach the sign. I spray painted the cardboard blue. Once that was nice and dry, I attached the metal sign to the cardboard. I just slipped the gold brad fasteners through the two holes the sign had and on through the cardboard. I was worried the sign would be too heavy to hold to the cardboard. This was not the case and it stayed perfectly.

Now that my white frame was all glazed, I still thought it needed a little more. I took some red paint I had on hand to add some racing stripes to the frame. I taped off a larger stripe and smaller stripe right next to each other using frog tape. I had to put on two coats of red paint for the stripes.

3
Once my red racing stripes were dry, I put my sign and cardboard piece all back together in the frame. It was exactly what I wanted for my son’s room! It turned out to be the perfect size and colors I had hoped for. Even though I didn’t originally like the sign, my improvements made me fall in love with it.2

Kate

Hi there, I’m Kate. Welcome to White Lane Decor. Thanks for stopping by. I love neutral, bright, and airy spaces. I’m always looking for new ways to turn our house into a home. Have a look around and find inspiration for your next project.

Disclosure

Some of my blog posts, ads, and banners contain "affiliate links." This means if you click on the link and purchase the item, I will receive an affiliate compensation. However, I only recommend products or services I use personally and truly feel you will enjoy too! I am disclosing this in accordance with the Federal Trade Commission's 16 CFR, Part 255: "Guides Concerning the Use of Endorsements and Testimonials in Advertising.” White Lane Decor is a participant in the Amazon Services LLC Associates Program, an affiliate advertising program designed to provide a means for sites to earn advertising fees by advertising and linking to amazon.com.

Shop My Home

Double Duty Dining Table

This dining table has been through two big transformations. When I was first getting into my “do it yourself” era; I picked this table up at an online yard sale page. That was six years ago. A sweet lady was getting rid of the table and six chairs. I didn’t love the chairs it came with so I needed up selling them. By the time I sold the chairs, I had practically recouped my money for the table. I got a great deal. She had used the table in her basement coming in from the pool. It was a place mostly just for the grandkids to come in and eat snacks after swimming. The cherry wood table top was in great condition. A few scratches and water marks but nothing some Restore- A -Finish couldn’t fix.

I really didn’t want to sand down the top and stain it again. Restore- A- Finish is this awesome product I like to use. I used fine steel wool to brush it on and scrub some of the problem areas. Then you just wipe it off with a clean lint-free rag. It really brought this table top back to life. Most local hardware stores sell it in a variety of colors to match your wood.

As you can see, the green base and legs of the table were not working for my style. In the first round of this makeover, I primed with my Kilz spray primer around the skirt of the top and the legs. Once that had dried for 90 minutes, I used Almond colored Krylon spray paint. This made it a cream color. After that had cured for 24 hours, I then glazed the base and legs. I used minimax jacobean stain as my glaze. Glaze just means you wipe a finish on and off, to give it an aged dirty look. Keep in mind this was six years ago and was really big at the time. I then put it all together and loved the way it looked. I even bought some crystal knobs at Hobby Lobby for the two front drawers.

table
I searched all the yard sale pages and found six chairs that were all different styles. I really liked the eclectic look. I also spray painted, glazed, and reupholstered them. It was really funky but I was going through a phase of figuring out my decorative style. I really liked color, I guess?? It was a great table and we used it two more years. I then realized all that color had to go. I sold off all the chairs I had searched so hard to find. I then took the table back apart and primed and spray painted it again. This time, I knew my style a lot better and went with white. I loved the style of the table and knew there was no need to spend money on a totally different table. Just a little paint would fix it up and make it work in our townhouse. Once it was all white, I had to find chairs to match again.

793874-1377462380-786525
IKEA had the perfect white chairs for a great price. The bonus was the matching barstools. I love the X back design. They fit so well with my newly painted table and I just love how it looks.

Now that we are building a new house, I think this table will get its third makeover in almost seven years. I still really like the shape and lines. I also still love all the white chairs and table base. However, the table top is about due for its makeover. I will probably break down and finally sand it all off. I think I want to whitewash the top. I have never done anything like that before so it will be interesting to see how it turns out. I still have seven months before that happens and the new house will be done. So, be on the lookout around that time for this tables third makeover.

20150722_094828-1

Kate

Hi there, I’m Kate. Welcome to White Lane Decor. Thanks for stopping by. I love neutral, bright, and airy spaces. I’m always looking for new ways to turn our house into a home. Have a look around and find inspiration for your next project.

Disclosure

Some of my blog posts, ads, and banners contain "affiliate links." This means if you click on the link and purchase the item, I will receive an affiliate compensation. However, I only recommend products or services I use personally and truly feel you will enjoy too! I am disclosing this in accordance with the Federal Trade Commission's 16 CFR, Part 255: "Guides Concerning the Use of Endorsements and Testimonials in Advertising.” White Lane Decor is a participant in the Amazon Services LLC Associates Program, an affiliate advertising program designed to provide a means for sites to earn advertising fees by advertising and linking to amazon.com.

Shop My Home

Little French Table

I love country french furniture. I found this table on a local yard sale page. When I showed up there were two of these tables. Why I didn’t end up buying both of them is still beyond me. That was dumb. The lady selling them told me this big long story about how they were from Germany (who really knows). One of the tables was a little off balanced so I took the one that stood firm on all four legs. I know I should have bought them both, but I didn’t (it still keeps me up at night, haha).

coffee-1
Surprise, I didn’t use chalk paint OR spray paint. I just busted out some good ole latex paint and went to town with a paint brush. I had some white latex paint laying around and I didn’t want to have to buy anything. I’m not sure what the color was but it wasn’t a bright white.It was a creamy yellow white. I didn’t prime the table first. I was going to sand and distress the table anyway to have some black and wood show through. I did put on two coats of paint. I was surprised the brush marks didn’t show up more. I do think it is important to invest in a nice paint brush. If you take care of it; then it will last forever. After each use rinse the brush out well and form the bristles back to the way they go.

After both coats of paint had dried for 24 hours; it was time to distress. Distress is a fancy word for using sand paper to let the wood or the base layer show through. I just randomly pick places and edges to sand. Once I got it all distressed, I put a quick coat of polyurethane on to seal it. c-tablle-1

Now, this table has two beautiful beveled glass pieces that fit into it. I obviously took those out while I was painting. Once the poly was all dry I bought it back into the house and used it as a coffee table. I am sad to say that I cracked a corner of the glass that fits into the table. Moral of the story; do not be lazy. I was using the table as a ladder to change the light bulb in the living room. Well, there my new little table was just underneath the light, in the perfect spot. I thought I could just quickly step on top of it and not put weight on the glass, only the outer wood. Well , when you change a light bulb, it is hard to keep your balance. I stepped slightly onto the glass and cracked a small part ;(. I still love my little yard sale table. I am now always careful and use a ladder to change light bulbs. 

Kate

Hi there, I’m Kate. Welcome to White Lane Decor. Thanks for stopping by. I love neutral, bright, and airy spaces. I’m always looking for new ways to turn our house into a home. Have a look around and find inspiration for your next project.

Disclosure

Some of my blog posts, ads, and banners contain "affiliate links." This means if you click on the link and purchase the item, I will receive an affiliate compensation. However, I only recommend products or services I use personally and truly feel you will enjoy too! I am disclosing this in accordance with the Federal Trade Commission's 16 CFR, Part 255: "Guides Concerning the Use of Endorsements and Testimonials in Advertising.” White Lane Decor is a participant in the Amazon Services LLC Associates Program, an affiliate advertising program designed to provide a means for sites to earn advertising fees by advertising and linking to amazon.com.

Shop My Home

Spray Painted Cabinet

In our little townhouse; I needed a spot to hide all of my DVDs , DVD player, and cords from the television. I had limited space between the piano and the fireplace. Everything from the television came out of the smurf tube right next to the piano. I wanted something with shelves inside so I could organize everything. I also needed it to fit the tight space between the piano and the fireplace.

So off to HomeGoods I went to find the perfect “thing”. I didn’t even know what to call it. A cabinet, holder of television junk, that thing that makes Xbox cords pretty? Anyway, I walked away empty handed. I then proceeded to check every store I could think of Target, TJ Maxx, Marshalls, Downeast Home, and Ross. NOTHING people, nothing! I had found this one cabinet that had a broken leg and haggard look at Ross on clearance. After checking everywhere else, I found myself back at Ross. It was already on clearance, but because it had so many issues, I was able to get it at an additional 10% off.

I brought my last ditch effort home to see if it fit. (I should have measured the space before I went on a wild goose hunt). IT FIT! I was so excited that it fit and it matched the trellis rug I had in my living room. I became more and more upbeat about this. The first thing I did was grab some wood glue and a nail gun to put the leg back on. Next came the tedious task of taping off all the mirrored front. That was not so fun.

Ok, listen up! Spray paint will change your life. Don’t get me wrong, there is a time and place for a real paint sprayer too. But for almost everything else, there is spray paint (I kind of sound like a Master Card commercial). It really is that easy and good. You get a professional sprayed looking finished piece ( if you get your technique mastered). Now go to my youtube channel (click on the youtube button on the left side of this page if on a desktop or bottom of the page on mobile) and check out the video I made all about how I spray paint and what product I use. And don’t forget to subscribe to my channel for more awesome tips and decor videos. There is a link on my home -page as well.

imag2758
Once the mirrored part was all taped off, it was time to prime. This is a black piece (black didn’t work with my style) so primer was needed. After it was coated with a good coat of Kilz, I let it dry 90 minutes. I then grabbed my favorite color of Krylon spray paint (white). I took the door off first because I wanted to spray the door in a different color (I know shocker, not white). After the cabinet was all white I left that to dry 24 hours and got busy on the door. I chose a soft gold color by Krylon. I love how it turned out! I wasn’t positive if I would like the touch of gold, but it adds just the right interest to the cabinet.

imag3003

Kate

Hi there, I’m Kate. Welcome to White Lane Decor. Thanks for stopping by. I love neutral, bright, and airy spaces. I’m always looking for new ways to turn our house into a home. Have a look around and find inspiration for your next project.

Disclosure

Some of my blog posts, ads, and banners contain "affiliate links." This means if you click on the link and purchase the item, I will receive an affiliate compensation. However, I only recommend products or services I use personally and truly feel you will enjoy too! I am disclosing this in accordance with the Federal Trade Commission's 16 CFR, Part 255: "Guides Concerning the Use of Endorsements and Testimonials in Advertising.” White Lane Decor is a participant in the Amazon Services LLC Associates Program, an affiliate advertising program designed to provide a means for sites to earn advertising fees by advertising and linking to amazon.com.

Shop My Home

Chalk Painted Piano

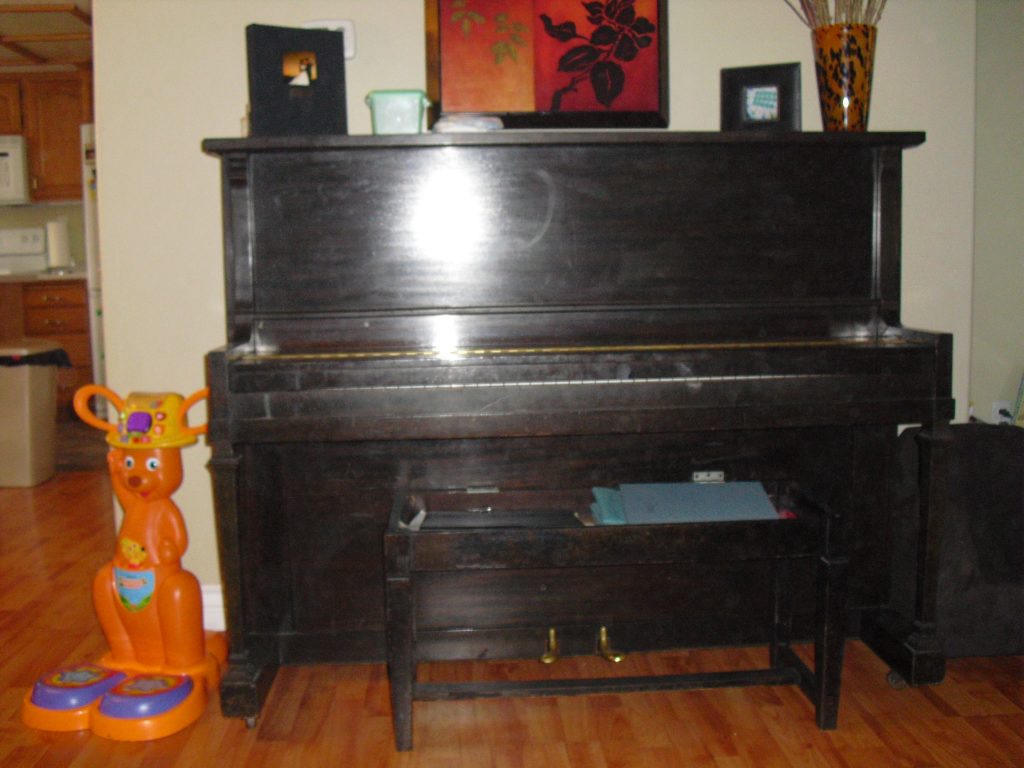
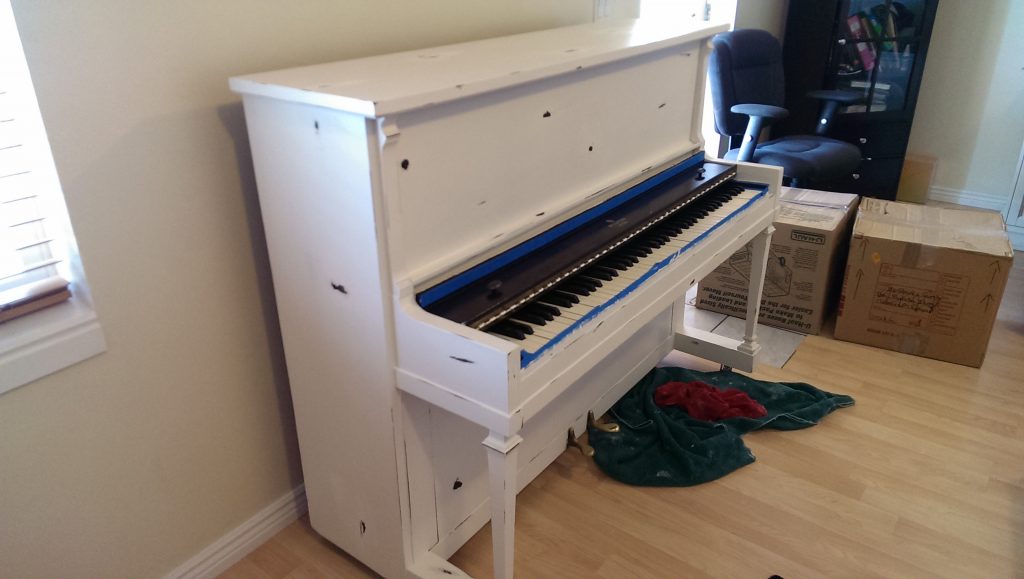
I know what your thinking….wow that was a lot of work and I could never do that. Well STOP! It was not a lot of work. It just took a little bit of time. Trust me, you will thank yourself later. I have had this piano for years. I bought it second hand on a yard sale page. I had it tuned and then it just sat in my living room in all its brown glory for years. I wanted to paint it SOOOOO bad but I just couldn’t commit. Until one day I had enough of that brown eyesore.

I did a lot of research and decided that the best method, that would require the least effort, would be chalk paint. Chalk paint is kind of amazing. Have you heard of it by now? There is NO prep work. By that, I mean no sanding or priming. That’s rights people, just get your paint brush and start painting. How much easier can it be? I knew that I was not about to try and sanding that beast of a piano. So I was so excited to take the dive and just use chalk paint.

cimg3953
Chalk paint can be expensive. There are a million different brands out there. It comes in all different colors as well. A very small can ( I mean the size of a quart) can cost $40. It can last a long time though because it doesn’t take very much. When I painted my paint a few years ago, there weren’t many options to buy chalk paint that we’re affordable. Since that time, everybody and their dog have released their own version of chalk paint. You can now go down to Lowe’s or Home Depot and find a brand for $13 a quart. I have never used these but I’m sure it will be just the same. So I went to Pinterest and found a recipe for homemade chalk paint. The recipe I used called for 1/2 cup Plaster of Paris (found at Home Depot), 1/2 cup warm water, and 1-1/2 cups latex paint. Dissolve your Paster of Paris in your warm water first while mixing well. Then once that has dissolved add the 1 1/2 cups of latex paint. Mix well and get to painting. I used just a regular angled paint brush. Some people say you HAVE to buy a special chalk paint brush but that is NOT true. My regular paint brush worked great. My piano took three coats of paint. I let it dry nice and good between each coat of paint. Also, I only mixed small amounts of paint each time because it doesn’t stay good for long. The paint will dry out and harden after a while so make sure to stir frequently while you are painting too. imag0934-1

Now here is the thing about chalk paint, it is grainy. Just like the name; it has a chalky finish. If you want a smooth polished look then don’t use chalk paint. It also shows brush marks from the paint brush. It is definitely a more rustic / shabby chic / distressed look. That is why a lot of people also sand or distress it after they are done painting too. You can see in my pictures where I distressed the piano to have some of the brown come through. This also makes the paint indestructible. My kids can race cars and bang toys all day long on the paint and it looks just like it was meant to be. This look isn’t for everybody but considering how easy it is, who cares?

Once you have enough coats of paint to your liking, and it has cured, It is time to wax. Now wax, in the chalk paint world, is the same as sealing latex paint with a polyurethane. It is just a protectant layer to seal the chalk paint. A lot of people also recommend buying a special brush and special wax for this too. No need! I used Minwax finishing wax/ paste. It worked great. Just take a lent-free rag and wipe/buff in the wax. make sure to rub it in good until there is a small sheen to the finish.

chalk-painted-piano
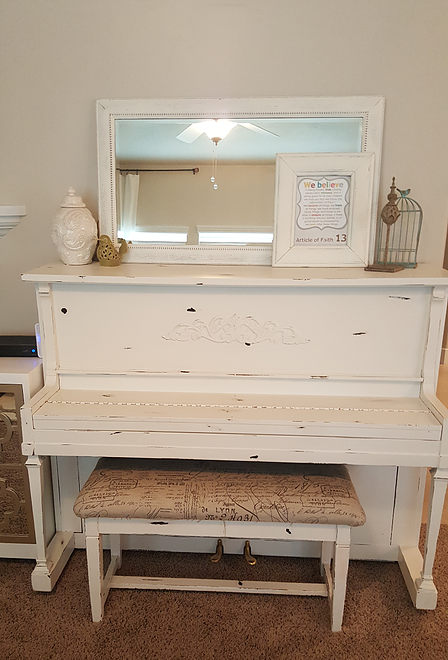
I didn’t even paint the inside of the lid. I left it brown so I wouldn’t have to mess with spilling on the keys. I’m messy and lazy like that ;). I think it still looks great because of all the brown showing through in the distressed parts. It really was just a little time consuming to sit and paint all three coats. I didn’t have to worry priming, sanding, or any prep. Just mix or buy your chalk paint and brush it on (Just make sure to brush it all in the same direction as much as possible). It’s that simple. Anybody can do it.

Kate

Hi there, I’m Kate. Welcome to White Lane Decor. Thanks for stopping by. I love neutral, bright, and airy spaces. I’m always looking for new ways to turn our house into a home. Have a look around and find inspiration for your next project.

Disclosure

Some of my blog posts, ads, and banners contain "affiliate links." This means if you click on the link and purchase the item, I will receive an affiliate compensation. However, I only recommend products or services I use personally and truly feel you will enjoy too! I am disclosing this in accordance with the Federal Trade Commission's 16 CFR, Part 255: "Guides Concerning the Use of Endorsements and Testimonials in Advertising.” White Lane Decor is a participant in the Amazon Services LLC Associates Program, an affiliate advertising program designed to provide a means for sites to earn advertising fees by advertising and linking to amazon.com.

Shop My Home